Friday, January 20, 2012

Haven't posted one of these in a while

But this one was worth sharing :)  The Nerd Test!

NerdTests.com says I'm a Cool Nerd Queen. Click here to take the Nerd Test, get geeky images and jokes, and talk to others on the nerd forum!

I scored much as I thought I would - high in the Science/Math, and History/Literature categories, and crazy-high on Sci-Fi/Comic.  I'm average in Technology/Computer dorkage (most of that knowledge is second-hand for me, so that's understandable).  And apparently I'm not as awkward as I think I am!  Or at least in comparison to other folk taking this test.

And as I final thought, I like my scoring title:  Cool Nerd Queen!

Wednesday, January 18, 2012

Oh So Pinteresting Wednesday - some beaded pins

Week 3 now - moving right along!

how pinteresting

This week, I'm talking about 2 pins I've beaded together.  One was from a Pinterest post, the other is one I put together myself.

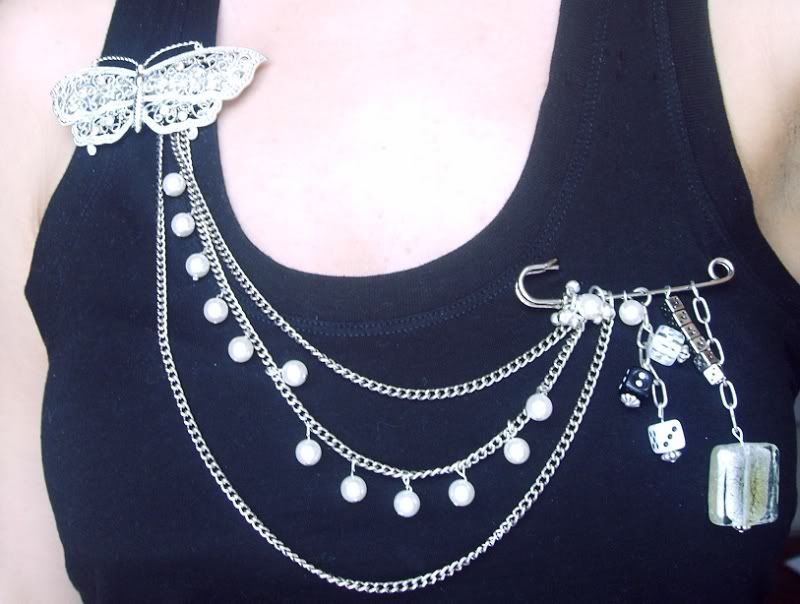
The inspired piece was this one.  The original pin was just a jpg online, no website or etsy shop or blog or anything that I can give credit too.  The best I can find is a photobucket album, with only the one picture in it.  So, to whomever first made this piece, I liked it enough to make my own version, and I wish I could credit you.

pin 'necklace'

It's an interesting variation on a necklace, just paired pins joined with chains and beads.  Something different to a necklace, but still dresses up an outfit.  I've worn it as a sweater chain as well, attached to the two fronts of a cardigan.  I like that how the drape of the chains can be adjusted by repositioning the pins, too.  The little things, you know?

pin 'necklace'  pin 'necklace' chains

While I was picking up supplies for the above piece, I had to go to JoAnn's for a few pieces - the pins, really.  I had all the chains and beads in my own stash.  But I did need the pins with the loops for attachments, so off to the craft store I went.  And of course, being a craft store trip, I found a few other goodies as well.  I was especially excited to find this locket, with a bunny embossed on the front.  It called out to be a pin!

bunny pin pieces 

So, using one of the other brooch pins from the package, I draped some silver chain and some linked pearl beads, and there you go:  a simple little shawl pin - with a bunny! 

bunny pin

Monday, January 16, 2012

A pair of quick beading projects

These are both kinda Pinterest-inspired, but really, I'm just going by a general idea I've seen there.  I like the lariat necklaces - easy to wear and adjust, and easy to fiddle with, as I am known to do with jewelry :)  And, as I've learned, easy to make too!  For both of these, you just need a length of chain, head pins, and accent beads and charms for the chain ends.  The accent charms for this style necklace need to have an opening in them - a ring or knot sort of pattern, that you are passing the other end of the chain through.

First up, one using black metal chain and charms, with colored beads as accents.  Be sure that the chain loop can pass over your head, as the charms don't fit through one another.  That is, it's an over-the-head sort of necklace, not one that you open and close, so be sure it fits over the head! 

black lariat  black lariat detail

The second chain here can be shorter, as the beads can pass through the opening in the silver knot.  I didn't intend for this originally, but Hobby Lobby only had one of the silver knots, so this is what resulted.  Can't complain though - I still really like the finished project!

silver lariat  silver lariat detail

Friday, January 13, 2012

Brace yourselves...

I'm trying to tackle sewing.

Not that it will become my go-to craft, but I need to become less scared of it.  I am considering it one of my New Year's resolutions, an extension of my Pinterest resolution.  Several of my pinned projects (heck, a whole Pinterest board of projects) are sewing projects, so I figure I need to conquer this.  And in addition, we need curtains in the bedroom, especially now that we're solidly in winter.  Our bedroom faces east, so we can get sunshine at most inconvenient times of the morning.  Curtains definitely called for!

The problem lies in how nervous I get about sewing.  I know that you can undo sewing as you can knitting, back it up to take out mistakes, but it's so much easier with knitting.

So, sewing attempts ahead!  You have been warned...

Wednesday, January 11, 2012

Oh, So Pinteresting Wednesday - Painted Doily Tank (& tote)

Week 2!  So far so good, hanging in there.

how pinteresting

This week is a craft project, part of my wardrobe updating efforts.  I have tons of basic polos in almost every color, and plenty of T-shirts, but I'm trying to update things a little.  So, a cute little tank top update is a nice project to tackle.  The inspiration project is here at Maybe Matilda.  She used a basic t-shirt, but I'm using a simple ribbed tank top (available either in your wardrobe already, or $3 at Wal-Mart or similar - doesn't have to be fancy at all)

What you'll need:
  • a tank or tee
  • a package of paper doilies (you could use single or multiple sizes as you prefer; I used two sizes from a multi-sized pack of doilies)
  • one or more acrylic paints
  • fabric painting medium
  • foam brush or sponge
  • a piece of cardboard (at least as large as your area to be painted - it's to place inside the top to prevent the paint from bleeding through)
I had never used fabric painted medium before, so had to actually look for it, wasn't something I had in-stash.  I found it at Hobby Lobby in the aisle with puffy paints and acrylic paints and so on.  It's designed to be mixed in with regular acrylic paints so that it becomes a fabric paint that won't wash out once it's set.  Oh, the possibilities!  However, be sure to read all the directions - different brands vary with their directions!!

And now onto the shirt:

1.     Put the piece of cardboard underneath the layer of fabric to be painted.  For the tank top (or a shirt, if you want to), that's inside the shirt.

lace paint tank in progress

2.     Mix your paint and fabric medium according to the directions (mine says to use a 2 to 1 mix of paint to medium).

3.     Arrange your doilies however you want on your top.  I liked the look of the inspiration t-shirt, where the lacy paint wrapped around the side of the tee.  I started with the medium-size doily from my multi-pack, placed down near the hem of the shirt.

4.     Lightly sponge paint over the doily.  You don't need to be too heavy-handed with the paint - the doilies tend to curl if they are over-loaded with paint (wet paper, you know).  Paint as much as you want.  I sponged just a little past the edge of the doily, so that you'd see the edge of the lace, but not much further than that.  Just go as far as you like, whatever you think looks good.

lace paint tank in progress

5.     Gently peel up the doily when the area is painted.  I loved how this looked, the painted laciness!

6.     Proceed to your next doily.  Arrange it as you like, paint as before.  I liked mine slightly overlapped and slightly offset (like bubbles, not like a snowman, if those analogies make sense).  The second two doilies I painted were the smallest size from my multi-pack.  I liked the decreasing look.  But, as this is a DIY project, you can do it however you like!

lace paint tank in progress

7.     When it's all painted as you want, set the paint according to the directions on the medium bottle.  Mine instructed you to heat set it (iron from the back of the fabric for at least 20 seconds), then let dry for 7 days, then wash.  Then, it's finally done.  I know, 7 days is an eternity when you want to use something you've just completed!!  I've seen other brands referred to with a 24 hour drying time, but the brand at Hobby Lobby was 7 days, so I went with what I had.

lace paint tank

8.     And then the wait is over!  Time to model - Ta-da!

lace paint tank


And while I was at it, I painted up another project.  This Monogrammed Tote was another project I'd found via Pinterest, and was actually one of the first projects I pinned.  I just love the look!  I had a plain canvas tote bag that needed some decorating, too, so this was just perfect.  The supplies are the same as the above project - paint, medium, doilies - plus a letter stencil and a tote instead of a tank.

inital tote supplies

I used the same technique that I used above.  I painted the doily first, then stenciled in the letter.  It was easier to lay the letter stencil in the open middle of the painted doily, then risk smudging the letter under the paper doily.  I had a stencil for the letter, but you can use a freezer paper stencil (like the inspiration project) if you prefer.

lacy frame done  initial stencil

My bag is a little more casual, I guess, compared to the inspiration.  I painted past the edges of the doily, so it does give it a little bit of a different look.  I like mine just as much, but it's something to consider as you're painting your own.

inital tote  inital tote

Wednesday, January 4, 2012

For those cold winter evenings

So, my year of actually doing my Pinterest Pins is starting off now.  I'm aiming for at least one a week, as I've mentioned previously.  I know that it sounds like a lot, but there are so many organization tips and recipes and so forth, in addition to all the crafty ideas, that I should be able to have something to talk about each week.  Inspired by The Vintage Apple (another crafty blog), and her Oh How Pinteresting Wednesdays, I think I will also try to keep them on Wednesdays, if I can remember.

how pinteresting

So, to kick things off, here's a recipe I found (of course) via Pinterest.  And it's perfect for this time of year, too!  Hot drinks are perfect for winter, so here is my attempt at: 

Homemade Instant Chai Mix

I became addicted to vanilla chai lattes back in SC, as the little coffee shop right across the street from my apartment has a deeeeee-licious one.  But this stuff is freakin' expensive, as drink mixes go!  Yes, it does taste better if you actually brew the Chai tea bags (there are a few brands that have a specific Chai box in amongst the Earl Grey and Peppermint and English Breakfast and so on) and then add the milk and spices yourself.  But let's face it: that isn't always practical.  So, this is a nice alternative to hot coco as a sweet after-dinner sort of hot drink.
There are several version of this recipe floating out about there.  As usual, I'll make some notes at the bottom here of the other versions I've found.  The one I started with was from MomAdvice, where they posted about homemade instant coco and instant chai latte mixes.

Ingredients:
  • 1 cup nonfat dry milk powder
  • 1 cup powdered non-dairy creamer
  • 1 cup French vanilla powdered non-dairy creamer
  • 2 ½ cups white sugar
  • 1 ½ cups unsweetened instant tea
  • 2 tsp ground ginger
  • 2 tsp ground cinnamon
  • 1 tsp ground cloves
  • 1 tsp ground cardamom
  • 1 tsp nutmeg
  • 1 tsp allspice
  • ¼ tsp white pepper
Directions:
  1. Combine all ingredients in a food processor and blend until it is a fine powder. 
  2. If you have a small food processor (as I do), you can combine everything in a bowl first, then pulse smaller batches of the mix in the food processor.  Pulse the smaller quantities in the food processor before transferring the mix into its storage container.   I found that my 8oz. canning jars held about 2.5 "fill-ups" of mix in my Mini-Chop food processor (Does that make sense?  I'm trying to say, it took 5 times of filling the Mini-Chop with mix to fill the 2 jars.  I wasn't paying close attention to my measuring cups as I was going along, so I can't be more specific than that...)
  3. Store mix in waterproof, airtight containers.  I used an store-bought instant Chai container that I had just emptied, as well as 2 canning jars.  The whole recipe above filled those 3 containers, plus 3 T. to make a fresh cup as I was finishing up.  Had to make sure everything tastes alright, you know?  Old cocoa tins or Crystal Light containers would also work as storage, particularly if you want unbreakable containers.  Store in a cool, dry place.
  4. To serve: Add two-three tablespoons of mix to 6-8 ounces of hot water or milk.
homemade chai latte mix  homemade chai latte mix

Notes, Variations, etc.

The ingredient list above is printed as I found it on MomAdvice.  However, as with any recipe using that many spices, you can customize it to your particular taste.  For example, the changes I made were:
  • I don't like the white pepper kick in some chai, so I just omitted it.  
  • I used 2 tsp Pumpkin Pie Seasoning instead of the 1 tsp each of nutmeg and allspice, as that's what I have in my spice cabinet.  Means that my mix has more cinnamon and ginger flavoring to it, since those are also contained in the Pumpkin Pie Seasoning. 
  • I like a stronger vanilla flavor in my chai lattes, so instead of splitting the creamer as half plain and half French Vanilla, I just made all 2 cups the vanilla creamer.  
  • Finally, I made mine sugar-free, using Splenda instead of sugar.  The end mix still turned out well.  Yes, yes, I know - chemicals into the body, but for those trying to watch our calories, hot drinks can carry a lot of sugar in them.  If you are someone who's sensitive to the tastes of sweeteners, though, I'd recommend sticking to the original white sugar called for.  
Oh, and as a side note, I got 2 batches of mix from one 3 oz. jar of instant tea.  Just to give you an idea for quantities.

 Allrecipes.com is (of course) a wealth of tips and variations and so forth, and this recipe is no exception.  It's the same as the recipe I used here, only with the pepper, nutmeg, and allspice listed as optional spices.  I love the tips and variations, though.  Be sure to read through them, as there is some great information in the comments!

Also on Allrecipes is a slightly different version using a mix of brown sugar and confectioner's sugar instead of the white sugar.  It also uses Vanilla Powder instead of the vanilla creamer.  I might have to keep an eye out for that, as I love a very strong vanilla flavor in my chai.

KitchenWitch on RecipeSecrets.net suggests that if you're concerned about the cost of the cardamom, which can definitely get expensive, you can buy the seeds whole (much cheaper) and grind them to a powder yourself using a coffee bean grinder.

MomAdvice also recommends this as a good gift idea, though I know that the season has passed us. With a cute mug, or some fun ribbons and wrapping, I can definitely see that!

Monday, January 2, 2012

New Year's resolution time!

Yup, new year, new set of goals.  I know I never end up keeping these all year long, but I feel a little better publishing them online here.  Accountability, y'know.  Even if no one talks to me specifically about them, I feel like I've done more than simply make some plans in my head.  I have published them, put them out there, let the world know, and so will (hopefully) have now a little more incentive to follow through.  We'll see how it goes :)

  • We've had another move this past year, so another group of friends in not-where-we-are.  I have now lived in 4 different towns in the last 6 years, with very dear friends in each of them (and plenty who've also moved elsewhere too).  I want to stay in touch more.  Not just online, though that does help, but talking to people.  Skype, phone calls, whatever.  I just want to stay in touch better!
  • I'd like to be more consistent in my workout routine.  That's really a given, I guess.  I got very derailed after we got extended in the desert last year.  An extra 6 months at that tiny, isolated, desolate little post really killed my motivation, and then moving at the end of it... it took most of 2011 to get a routine going again!  Completely killed all the progress I'd made in my weight loss efforts.  Very disappointing.  So, I'd really like to be more consistent about my workouts.  There are several classes I'm trying to get into the habit of attending at the gyms on post, and there a number of local races that look like fun, and a number of bigger ones in Austin, San Antonio, D-FW area, and Houston, too.  It's one of those cases of "I know what I need to do; now I just need to stick with it."  And with being a bridesmaid in October, maybe that'll be the extra bit of motivation I need to get myself back in shape :)
  • I will admit that I'm a Pinterest addict.  So, as a resolution for both blogging and computer-time, I'd like to actually do more of my Pinterest pins.  Read the books, make the projects, try the recipes...  And of course, once I've tried a pin, I will post here and give feedback, or directions on how I did it instead, or whatever.   You know, like I've been doing with my Pinterest-inspired posts so far, but on a more regular basis.  Mondays are movie posts, so maybe every Thursday perhaps?  I'd like to aim for a Pinterest-inspired post each week.  I know that sounds like a lot, but I think it'll be pretty doable.  A good number of my pins are recipes, so there will be a bunch of food posts.  Motivation to try new recipes!  Just trying to get myself off the computer a bit more and back into the real world... and then back onto the computer to blog about it :) 
  • And also on the crafty side of things, STRICT YARN DIET!!  'Nuff said.