Saturday, April 21, 2012

Suprise!!

This is just a quick little post about a tiny little race, but I'm very excited about it and had to share. 

The race this morning was one of the free 5Ks that MWR hosts on base.  I was actually pretty excited about it.  The weather was gorgeous.  We'd had an unexpected cool front move through, so it was about 60 degrees, a bit cooler than usual for this time of year in TX.  60 degrees, sunny, light breeze - really couldn't ask for better conditions.  And running felt great - strong, powerful, comfortable.  How running is supposed to feel!

So, I run my race, and am chatting with Zach and a friend at the end of the race, and all 3 of us had run really good races.  His friend and I had both run PRs, and Zach had comfortably beaten his goal time (his PR was way back in high school and was crazy-fast).  I had dropped so much time off my old PR (which was, by the way, about 5 years old, but I hadn't run close to that in ages) that I was wondering if I'd set my watch wrong.  I go by my wristwatch on these races, as (being free) there aren't the big time clocks around the course and no chip-timing, so my own stopwatch is usually my most accurate time.  Hearing that the guys had both had unexpectedly great runs too, I was wondering if the course had been mis-measured.  You know, 3 miles instead of 3.1.  I simply felt too good to have been that much faster than usual!

So, we got home, pulled up LogYourRun and mapped out the course.  No, it really was a full 5K!  I had just dropped almost a minute and a half from my best time!  Apparently running in an area in almost perfect weather, without high winds and absurd dryness, will make a difference. No, I don't miss the desert! 

And my new PR makes me feel like a Runner!  I ran 26:47, which is about a 8:38 pace.  My old PR was 28:00, which is a 9:00 minute pace.  I seem to hang out around the 10:00 pace a lot, which isn't anything to sneeze at, but can be considered more of a Jog than a Run.  But now, my PR pace is under 9 minutes!  That would be right about a 2 hr half-marathon!  That's getting into Real Runner territory!!  I've been bouncing off the walls all day thinking about it.  So proud of myself  :)

And really, how often do you run a race so well, surprise yourself so solidly that you're more likely to believe that the course is inaccurate than that you ran so fast?

Tuesday, April 10, 2012

Review: the Thin Red Line

Yup, some more movie chatter!  Most of my viewing time recently has been TV shows, several of which might make there way here eventually, but yes, we do still watch movies from time to time :) This was one that had ended up on my queue after reading one of the Top 100-type lists.  I can't remember if it was in an article or one of the AFI lists, or what, but it was ranked as one of those 'movies you should see.'  So I did!  Here you go, my thoughts on The Thin Red Line.

The Thin Red Line poster

Plot:  The movie follows an Army company during the Battle of Guadalcanal, from the landing on the beach through much of the fighting.  An ensemble piece with a very strong cast, the film examines the soldiers' thoughts and reactions to the bloodiness and chaos of the war they have been drawn into.

There are two areas of comments that I have for this movie - artistic merits and entertainment value.  It really is one of 'those movies' when it comes to art v. entertainment.  And the movie will appeal to some and not to others for exactly this reason.  If you're looking for a daring-do sort of adventure movie or a more 'traditional' sort of war movie, this is not the film for you.  Even other modern war movies, like "Saving Private Ryan" for example, while less traditional, are much more plot driven than this one.  "The Thin Red Line" explores greater themes using the war as a setting, rather than the story itself.  It really doesn't matter what battle, or even what war, this company is involved in.  Amidst the chaos of battle, the characters examine themes like courage, death, and the existence of God, among others.  I'm sure they could have set a similar story in WWI, Vietnam, modern day fighting in Iraq and Afghanistan.  The point is more the human reaction to war, not the battle itself.  Very much a 'thinking' war movie.

And this cerebral aspect makes it an interesting movie, one to watch at least once.  It's a very Artistic take on a war movie.  I considered it a 'surreal vision of the idea that War Is Hell.'   The way they play with sound for example - some of the most chaotic, bloodiest, violent scenes of battle are almost soundless, simply a character's voice-over or an light instrumental piece.  Where another movie would be at one of it's loudest points, this one is at one of it's softest.  It give the fighting a very detached feel, like you have been inescapably sucked into the storm, but that you are watching from outside as it swirls around you.  The pacing too - things that might have been the focus of another movie (action scenes, battle, etc) are more quickly paced and more time is spent on the build-up to battle and on the aftermath.

Thinking of pacing, this is veeeeeery slowly paced (it is 3 hours, after all).  It honestly took me a good third of the movie to get into the story and to distinguish and care about any of the characters.  This is where the 'entertainment value' critique comes in.  I will care much more about the philosophic pondering of someone if I can distinguish them from each other.  Characters also appear and disappear from the story with little announcement or explanation.  Yes, I realize that's how battle goes, but it does make it harder to follow which soldier is following which train of thought.  And thinking of details almost omitted, I had to look up the plot description first to even know what battle they were preparing to fight.  It was very vaguely discussed at first, more talk of "taking the airstrip" or "taking the island" rather than Guadalcanal as a specific name.  I guess this was done intentionally, to keep the movie as more of a commentary on war itself, as opposed to this specific battle.  For an entertaining movie, one typically turns to plot-driven films.  This is much more slowly paced, taking the viewer through the characters thoughts as they face battle and survive it.  Quite honestly, philosophic epics aren't usually what one chooses for light afternoon fare.  Still, if you're looking for something deeper, this is a well-done film.

Finally, the cast.  This is another area in which the film excels.  It's an ensemble piece, and just about everyone who has a speaking line is Somebody, or became Somebody.  The leads, if there are any, are played by Sean Penn and Jim Caviezel, as a jaded sergeant and a quiet, spiritual, almost ethereal private.  Caviezel does a lot of the narrating, and his soft, smooth voice suits well all the talk about finding courage and finding what lies after death.  Penn's gruff sergeant tries more to find the numbness that will let him survive this carnage after being in so many other battles.  Ben Chaplin plays another major role, as a soldier thinking of his wife at home (definitely a part where the movie drags, as he dreams of his wife).  Chaplin's longing and sadness give him probably the most emotional character.  It's a very strong cast, and seeing the reputation of the director, I'm sure people were falling over themselves to be a part!  

Overall: 3 of 5.  Liked it, very well done, but also very veeery long.  Hard to get into, and hard to feel for the characters for easily the first third of the movie.  Not one for the shelf, but I'm glad I've seen it now.

Thursday, April 5, 2012

Pinteresting Wednesdays - shelf signs

A little home decoration this week on Pinteresting Wednesday.
how pinteresting 

This is one of those Shelf Word Frame Things.  I'd give an original inspiration pin, but there are so many variations out there, that it would be hard to pinpoint my exact inspiration.  Some use blocks or wood pieces for each letter, others (like mine) use picture frames, some use candles for each letter, and still others use those apothecary jars that are so popular.  Some are for holidays - "Boo" for Halloween, for example, or "XOXO" for Valentine's Day.  Others are more general, like "Home."   Like I said, lots of variations! 

Here, I humbly present my version "Read", made for our library at the house (the room with all my bookshelves and the main computer desk). 

Materials:
  • Picture frames, enough for 1 per letter.  I got mine at the Dollar Tree.  I wanted them to be "a set but not matching" so they are each a different style, while all being the same photo size.  You can mix or match yours however you want, obviously :)
  • Old book.  I used an old law text that was being discarded by the library where I work (if you look closely, you'll see that the pages all mean something to me by topic!).  Libraries and used book stores will be a great source for this part.  Make sure the pages of your book are big enough to fit inside your frames without gapping.
  • Chipboard letters. I used chipboard instead of wooden letters or scrapbooking letters because they were the size I wanted, were not too big that they couldn't fit beneath the glass of the frame, were cheaper than scrapbooking letters, and
  • Spray paint in desired color.  I used Krylon Oil Rubbed Bronze.
  • Glue.
Instructions:
  1. Spray paint letters and frames desired color (prime if needed, depending on material, paint, etc).  As I mentioned above, I used the Oil Rubbed Bronze color on both the letters and the frames.  It took several coats to achieve a nice rich look, but I like the end result a lot.  Let dry completely.
  2. Trim book pages so that they fit inside the frames.
  3. Place your painted letters in the desired positions on each page.  I tried to keep mine centered in each frame, and (of course) lined up with the text of the pages.
  4. Glue letters in place.  Let dry.
  5. Place pages with letters in frames.
  6. Arrange on shelf!  I love simple projects :)
Here you go, in place on top my bookshelves in the library:

Wednesday, February 22, 2012

Oh So Pinteresting Wednesday - Quote Scarf

Almost through February now - Week 8 already!  This year is flying right along!

how pinteresting

This week is a lovely project that I fell in love with soon after I first stumbled onto Pinterest.  The original DIY instructions are from Stamp48, with the original inspiration piece being a scarf from We Are Owls' Fall/Winter 2010 collection.  Like Lauren over at Stamp48, designer cashmere scarves are a little (read: solidly) over my budget, no matter now gorgeous they are.  So, I followed her instructions on how to create a similar scarf of my own.  What follows, as always, are the original instructions, with any notes, advice, alterations, etc. that I used in making my own version of the piece.

What do you need:
  • a scarf, pashmina, length of fabric, etc. that you want to decorate.  I used a pashmina I found on sale, a nice and inexpensive woven wool blend.
  • a fabric paint pen.  I used Fabric Mate, a chisel-tip paint pen, which was perfect, as I could make my writing angled and 'swoopy' and pretty :)
  • a quote you like
  • optional - painter's blue tape, or similar removable masking tape
  • also optional, but highly recommended - something to cover your workspace (I used my knitting blocking boards)

    quote wrap supplies
What do you do:

1.     Protect your workspace, particularly if your scarf is thin or your brand of paint pen tends to bleed.  I have interlocking blocking boards for my knitting, so I laid out three of them as one long rectangle, and it was the perfect size for my pashmina.

2.     Lay out your scarf.  I left mine wrinkled, as I liked the effect that the texture gave to the lettering.   

wrap laid out

3.     I anchored my scarf to the craft mat I was using (i.e. my blocking boards) with some blue painters tape.  I didn't pull the scarf taut over the boards (like I said, I liked the texture), but the anchoring of tape did help cut down a LOT on how much the scarf slid around as I wrote.

4.     Write out your quote on the scarf.  Yes it really is this simple. 

quote wrap

5.     Follow the instructions for your particular paint pen on how to set the ink.  For the brand I used, all you had to do was let it dry for 24 hours.

6.     Shoo away helpful kitties to take a picture of the finished project.  I swear, there's a crafter deep down in that cat - so many of my craft projects have him investigating/sitting atop my work!

quote wrap approval
    Things to consider:
    • I practiced my quote in a font I liked on paper first, to get the spacing as I liked it.  Nothing fancy, just a regular lined notepad worked fine, but it gave me an idea of how big to make my letters. 
    • Lauren over at Stamp48 also suggested practicing on a similar fabric, to get used to how the pen writes on your particular material.  I skipped this step, as I had no similar fabric to practice on.  However, I was using a long quote and had practiced my lettering on paper beforehand, so I just wrote slowly at first to get used to the pen.  I also was using a fabric pen more like a marker than a paint pen, so didn't have to worry as much about ink bleeding or how hard to squeeze the pen to control ink flow.  A little thing I hadn't considered when shopping for a paint pen, but it turned out to be a nice little bonus.
    Fabric Mate marker with wrap
    • I did estimate how many lines I would use to write out my quote, and used a tape measure to roughly mark approximate spacing for the start of each line of text.  Just plain sidewalk chalk worked perfectly.  An extra optional supply, I guess, depending on how you want your quote spaced.  I wanted it relatively evenly spaced, but not too precisely so - the inconsistencies give it a nice handwritten feel.
    • I let my ink dry a little while the scarf was laid out, and then went back over some of the letters.  Some just needed some extra emphasis (like the starts of the lines of text), some letters were just kinda light to begin with.  Means that my scarf took a little to dry, but I liked the ultimate effect.  Just another option to play around with to give your scarf a personal touch.  
    • Thinking of ink drying... Don't wear long sleeves, particularly if you're also a lefty.  It's the chalkboard effect all over again (Am I dating myself now?  Do many schools even still use chalkboards?)  At any rate, I had dark purpley-blue ink all down my fore-arms when I was done.  Lovely smudges that looked like bruises until I washed my hands... and my arms all the way to my elbows!  I hadn't smudged the writing, as I wasn't writing that quickly, but I did end up with ink all over.  In short, be prepared; you are working with ink after all.  Don't wear anything you wouldn't want smudges on.
      What quote did I use?  One of my favorites from Ralph Waldo Emerson:
      Finish each day and be done with it. You have done what you could. Some blunders and absurdities no doubt crept in; forget them as soon as you can. Tomorrow is a new day; begin it well and serenely and with too high a spirit to be encumbered with your old nonsense.
      I'm a worrier, a fretter, an over-thinker.  As my life becomes more hectic with more Army moves in the future, and grad school rapidly approaching, I wanted something to remind myself to let go of what I can no longer change and focus on doing my best with what's ahead.  I'm fond of accessories that have hidden meanings like that - charms on a necklace or bracelet, quotes on a scarf, that sort of thing.  No one else might see them, but I know they are there, and it is a nice reminder for me.  Like I said, I'm a stress puppy, so every little thing to help keep me sane :)  And if it's a pretty scarf to drape around my neck, even better!

      Wednesday, February 15, 2012

      Something Pinteresting for my closet!

      A simple project this week, a hanging scarf holder for the closet.

      how pinteresting

      So simple, so cheap!  All it takes is a coat hanger, a set of shower rings, and ribbons or cable ties to hold everything together.

      supplies for scarf hanger

      The original project at Dollar Store Crafts used ribbon to attach everything.  I used cable zip ties, just the tiny ones that come in a bag of 50 or so.  I like the neater look that the cable ties give.  And I'm the type that would grab the ribbon and untie it as I was trying to remove a scarf from the hanger - that's just me.  A warning, though, that the cable ties can be a little 'snaggy' on fabric, so if you have a lot of delicate fabrics, or open-weave scarves, or similar things that will catch on the zip ties, you might want to go with the ribbon instead.  I just watch carefully as I pass the scarves in and out of the rings, and my more delicate scarves hang on a different holder.

      scarf hanger  scarf hanger

      Ta-da!

      I've also seen this version, (sorry, the original is from a Tumblr feed, so I don't have a better link) where the shower rings are just hanging from the coat hanger.  You know, like shower rings do on the shower rod, not attached to each other.  I didn't go for this version, as I have a tendency to have things hanging on a single coat hanger end up all on one end, very unbalanced.  I liked the 'grid' version instead, better for my organization style I think.  And, no, I didn't hang it up like in the picture above.  I trimmed the ends of the zip ties first :)  As of now, I've made two of these for my scarves in my closet, and love being able to see everything not just stuffed in a drawer!

      Sunday, February 12, 2012

      Another Test Knit done!

      This time it's a cowl. It's another gifted project, because as lovely and light as it is, it's still out of alpaca. Meaning it's a liiiiiitttle too warm for TX. Sigh...

      So, The Fossil Cowl:  (mine is Raveled here)

      Fossil cowl

      The yarn was Knit Picks Alpaca Cloud, a lace-weight alpaca blend.  I'd picked up this skein from a knitting buddy when she de-stashed prior to a move.  She found that she knit more in sock weight than lace weight, so no need to keep the lacy stuff right?  Score for me!  Made out with some lovely lace weight alpaca :)  Thanks again, Sarah!!  This particular skein was one that I earmarked for Mom almost immediately - a perfect tweedy chocolate brown, a perfect example of "Mom's Colors."  So when this project popped on the Ravelry Pattern Tester board, it was the perfect match!  It was a very easy yarn to work with, and Knit Picks is always reliable quality at not-arm-and-a-leg prices.  And the final result is very soft and squishy, very nice to have draping around one's neck.  Definitely a yarn I'd use again.

      The pattern is the Fossil Cowl by Lusianne R., available as a Ravelry download.  I really liked it - it is quick and easy, without being boring.  No miles of garter or stockinette to give it that lovely squishy texture.  I hadn't worked with the ridge stitch before, so that was a nice, new addition to my repertoire, but it wasn't a complicated one to pick up.  This would be a great stronger beginner's project - you knit in the round, and there's tons of practice with K2tog and ktfbl (increasing and decreasing skills, always handy).  And if you're holding the yarn double, there's practice with knitting with two strands - with the yarn I was using, that was a little challenging, with the fuzzy clinginess of alpaca, and all.
       
      Fossil stitch pattern
       
      Oh, and as a bonus, it was the first chance I had to use my new blocking wires that I got for Christmas!  You can barely see them in the picture below, but they are there!  It was very exciting to use them :) 

      Fossil cowl blocking

      Mods:  only one this time (surprising for me, but it was a test knit - I try to actually follow the pattern closely with those).  So, the only modification I made was extending the number of repeats.  The original pattern calls for 21 repeats before beginning the last repeat/edging.  I did 24 instead.  It made the cowl a little 'taller,' so that there is almost a complete doubling over as it wraps around the neck. 

      Fossil cowl

      Overall, would definitely make this again. I think this is a lovely pattern, and would work well in other yarn weights.  For example, in a sock yarn, instead of lace weight held doubled, you wouldn't even have to mess with gauge much, if at all.  And this is a very easily customizable pattern too - adjust the number of stitches cast on (she offers the pattern in 3 sizes, but you can cast on any number of stitches in-between, according to personal preference); or adjust the number of pattern row repeats, as I did (make the cowl taller or shorter, depending on how much you want draping around your neck).  The adjustability means it's a perfect pattern for those skeins of gorgeous painted lace and sock yarns!  Just keep knitting until all your yarn is gone, nothing wasted!

      Thursday, February 9, 2012

      While I'm posting on necklaces...

      Here are 3 of my own that I have put together recently.

      This one is a collar-bone length necklace (17inches-ish) - I haven't measured exactly, but that's where it reaches on me.  The swirly tan and red beads were clearance finds from Goody Beads and the red beads just from Michael's (I think... or Hobby Lobby or Joann's - a big-box local craft store, at any rate).  I wanted just a simple piece here, so strung them on, and added a basic toggle clasp.  It looks really cute with a neutral outfit and my bright red flats - I love the little flashes of color!

      red and tan necklace red and tan necklace

      This one started with a pendant I found at Wal-Mart, of all places.  I would have loved to have some green beads up in the necklace along with the pearl beads, but it's such an unusual shade of green in the lighthouse, it was hard to find any beads to match.  So, I just stuck with the basic brass and pearl.  I really like this pendant, as the lighthouse reminds me a little of the old lighthouse from where I grew up, though that one is brick, not white.  Similar shape though - enough to remind me a little of home!

      Had to hunt a little for the brass bead caps.  Apparently, that particular size and metal is more unusual, one of those supplies that you just have to order online most of the time.  Lucked into some at Hobby Lobby, though, so saved me some S&H.  Everything else in the necklace came from my stash - the brass accent beads, the chain, and the two sizes of pearl beads.  I didn't worry about a clasp on this one, as it's a long necklace and fits over my head easily without one.
      lighthouse necklace
      lighthouse pendant  lighthouse necklace pearls

      The last one in this post is another long one.  This one is inspired by one Anne put together when she visited last summer.  I liked it so much, that I made a similar one for myself!  The teal beads were ones left over from Anne's project, while the black beads were two sizes from the stash, as was the chain.  The pretty pendant was from Hobby Lobby.  I didn't worry about a clasp on this piece either, since it's another one long enough to just go over my head.  Nothing too unique about this one, just a basic necklace, but I do love those colors!
      teal & black necklace  teal & black necklace

      Wednesday, February 8, 2012

      Oh So Pinteresting Wednesday - charm necklace

      Another Wednesday, another Pinteresting project!

      how pinteresting

      The project up this week is a necklace, inspired by one of my favorite blogs, Flamingo Toes.  Oh, how I love Flamingo Toes!  I'm particularly fond of her jewelry tutorials - check them out, as she has some gorgeous DIY Anthropolgie necklaces!   I swear, there are about a half-dozen necklaces on my Pinterest DIY Jewelry board that are from her site.  She does great tutorials for her work in general, not just the jewelry.  They're very thorough and lots of pictures, so I really don't have too much to add from the original post, just a few things I did to personalize my own necklace.

      The necklace that I'm making a la her instructions is the DIY Cameo Collage Knock-off.  It's inspired by an Anthropologie item, the Cameo Collage necklace, which (like many of their items) is very cute, very fun, and very expensive.  So, here's my version, based on more affordable instructions.

      Anthropologie-inspired charm necklace 

      What you'll need:
      • Chain - this is one of the changes I made.  The original instructions called for 2 different lengths of 2 different styles of chain.  I wasn't as fond of that look, plus I had a longer length of a chain that I liked, so I used that instead (if you're curious, I think it was about 3 ft of chain)
      • Assorted Charms – I used 24 but your number will vary depending on how full you’d like the necklace (this is another change I made - all my charms are silver, instead of an assortment of colors, metals, etc - just personal preference)
      • Jump rings - enough for the clasp and all your charms
      • Closure for necklace – any kind (I used a toggle clasp, as I like that sort of closure)
      charm necklace supplies

      Lay out the chain.  This is one of the biggest changes I made to the original instructions.  Since I was working with one long length of chain instead of attaching a smaller length to a longer one, I altered the set-up of my necklace a little.  I measured out an approximately 8 inch length of my chain to serve as the 'short chain' from the original instructions.  It's only "approximately" 8 inches, because of the sizing of the decorative links in the chain.  I doubled over the chain, so that the 8 inches became the 'short chain' position in the original instructions.  At the 'fold' in the chain, I attached one half of my toggle clasp using a jump ring - you can see it in the next picture below (the larger loop off to the right of the chain).  Where the loose end of the 8 inch stretch met back up with the 'main' chain, I played around with positioning til the two lengths of the chain were spaced as I wanted them, then joined the end to the main chain with a jump ring.  The other half of the toggle clasp I attached to the 'far end' of the chain with a jump ring as well.

      Lay out the charms.  It reeeeeeeeeally helps to lay out the charms before attaching them.  This is your chance to really personalize the necklace.  You have the chance to set up a good balance - big vs. small charms, for example, or arranging colors (if you have them), shapes, and textures as you like them.  I placed a larger focal charm at the center of each length of chain, and worked my charms outward from there.  I'd recommend that as a plan of action - a lot easier to balance the charms and the necklace from the center out than from one end to the next!  In the case of my necklace, the center charms are the squirrel on the lower loop and the compass rose on the upper length. I alternated small and large charms, and tried to match small to small charms on either side of the center, and large to large.  I was hoping both for visual balance, and to help reduce any sliding around on my neck from an unbalanced necklace.  I hate jewelry shifting around on me!


      Once you have a placement of charms that you like, attach your charms to the chain.  Again, work from the center outward.  Flamingo Toes has good pointers on using jump rings back in the original instructions.  I learned some things too, so it's a good idea to read up!  

      And ta-da!  Yes, this is a very easy necklace, and it's a lovely effect, too.  My favorite type of project!

      Charm necklace

      I personally like wearing mine with a polo or button-up shirt.  The collar forces the necklace open a little wider, so that you can see more of the charms as they hang.  The necklace itself is a little bit heavier than some of the ones I've made, what with the bigger decorative chain and all the charms on it.  Not a big deal, but it does mean that it tends to draw toward the center and bunch up a little as it hangs around the neck.  A collared shirt counteracts this nicely.

      To summarize:
      • Not too many changes from the original instructions, really.
      • All my charms were silver, not a mix of materials.
      • I used one chain adjusted to form the two lengths, instead of two lengths of different chains.
      • Going along with the change in chain set-up, my clasp is on the side (the "fold" in the chain) instead of at the back of the neck.
      And if you want to know some of my charm highlights, we've got (in the left-hand picture): a ribbon (several causes close to my heart to remember), a tea pot (I love my tea!), my initial, a compass rose (for travel), the year I married, a paw print, a yarn ball (of course), and a dragonfly.  Below them are a Celtic tree, a squirrel (for W&M and for Mom), a shamrock and heart (lucky in love?), a pretty shiny, a woven textured charm, a sunflower, a cat, another pretty shiny, and a butterfly.  In the right-hand picture we have: a cat (yes, lots of cats), and then back to the ribbon, tea pot and so one.  Below, a star (just a pretty shiny), a matching pretty shiny to the other side, a frog, a ladybug, another cat, a matching clear charm, and then back to the Celtic tree.

      Yes, there aren't any penguin or bunny charms on there yet.  But did you see - it's just "yet"?  One of the nice things about this project is the extra space I have to add additional charms as I find them :)  Always room for a little penguin or bunny or a particularly sentimental something!  And like charm bracelets, this is a great "travel" project - a beautiful way to display little souvenir charms, without making your wrist jingle like crazy!
      Charm necklace - left side Charm necklace - right side

      Wednesday, January 25, 2012

      Oh So Pinteresting Wednesdays - organization ideas

      So, this is really a post sharing a few tips I've found via Pinterest and tried out at home.  Not a picture-heavy post, but there are so many good organization and sorting and similar helpful tips that I feel it's worth a post to share some I've given a try.

      how pinteresting 
      First up:  Kitchen box storage.

      The idea: use narrow storage boxes to store kitchen wrap boxes (saran wrap, aluminum foil, etc).  Brilliant!  Whoever first thought of this one is a genius!  Our boxes of Ziploc baggies, plastic wraps, etc. are all stored on the kitchen cart near the microwave.  Very convenient, but they can be easily knocked off, I admit.  The original poster used scrapbook paper holders to hold the boxes of kitchen essentials.  I used magazine holders instead.  The magazine holders are about the same size, though maybe not as deep as the scrapbook holders (which are designed to hold the standard 12x12 scrapbook paper).  Still, the magazine boxes are definitely available in tons of colors and a whole range of prices, however fancy you want to be.  And Zach even noticed this one and commented on it!  It's definitely a good idea when someone picks up on it without it being pointed out!


      Next:  For my bracelets.

      All it takes a paper towel holder!  A brilliant idea from The Adventures of VAMH.  Find a nice pretty towel holder, and slide your bracelets on.  Ta-da -there are your bracelets, nicely stacked and on display.  I really like it - I can see my bracelets, and so will actually wear them, instead of leaving them in my jewelry drawer where I might forget that they are there.  The holder I use is one that has a second, smaller post as well as the main tall one - you know, the little post that keeps the paper towel roll from unwinding?  I use that second one to keep my watches separate from the bracelets.  I've only got 3 watches, and I might not always wear a bracelet, but I ALWAYS wear a watch.  So, that second post is a bonus to keep my most worn pieces out separate from the others.


      And then: Extension cord holders.

      Just use a toilet paper tube!  The link for this comes from apartmenttherapy.com, which has some other great ideas for organizing and decorating a small space, if you have the time to browse through.  The toilet paper tubes keep the extension cords wonderfully untangled, and let's face it, are free!  You can always decorate them as well, just scrapbook paper you have on hand works beautifully.  And for extra sorting help, label the tubes with the length of the cord contained within.  Mom actually suggested that extra tip, not a Pinterest patron (thanks, Mom!).  She said that this was how Grandad kept his electrical cords sorted (and he certainly had plenty of them!!)


      And now: For the car.

      I LOVE this idea from BHG.com.  It's just one of those large lidded, plastic handled, pourable cereal boxes.  They are the size of an average shopping bag (who knew?), which is just kept in place by the lid.  The lid keeps your trash bag from spilling all over when you have to brake suddenly, and it keeps the smell and stickiness from the trash well contained too.  Just empty the whole plastic bag into your house trash when you return from your drive.  Too easy!  And Zach love it too, as it  makes it easy for him to move the trash to the back seat, should he be riding in the front passenger seat.  Much easier for him to move the car trash bag out of the way to give him some leg room when it has a lid and handle attached!

      Friday, January 20, 2012

      Haven't posted one of these in a while

      But this one was worth sharing :)  The Nerd Test!

      NerdTests.com says I'm a Cool Nerd Queen. Click here to take the Nerd Test, get geeky images and jokes, and talk to others on the nerd forum!

      I scored much as I thought I would - high in the Science/Math, and History/Literature categories, and crazy-high on Sci-Fi/Comic.  I'm average in Technology/Computer dorkage (most of that knowledge is second-hand for me, so that's understandable).  And apparently I'm not as awkward as I think I am!  Or at least in comparison to other folk taking this test.

      And as I final thought, I like my scoring title:  Cool Nerd Queen!

      Wednesday, January 18, 2012

      Oh So Pinteresting Wednesday - some beaded pins

      Week 3 now - moving right along!

      how pinteresting

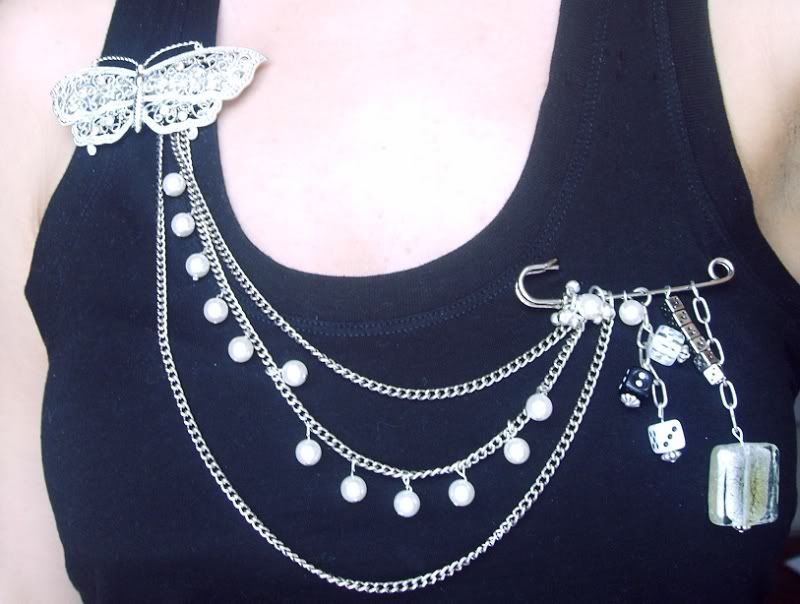
      This week, I'm talking about 2 pins I've beaded together.  One was from a Pinterest post, the other is one I put together myself.

      The inspired piece was this one.  The original pin was just a jpg online, no website or etsy shop or blog or anything that I can give credit too.  The best I can find is a photobucket album, with only the one picture in it.  So, to whomever first made this piece, I liked it enough to make my own version, and I wish I could credit you.

      pin 'necklace'

      It's an interesting variation on a necklace, just paired pins joined with chains and beads.  Something different to a necklace, but still dresses up an outfit.  I've worn it as a sweater chain as well, attached to the two fronts of a cardigan.  I like that how the drape of the chains can be adjusted by repositioning the pins, too.  The little things, you know?

      pin 'necklace'  pin 'necklace' chains

      While I was picking up supplies for the above piece, I had to go to JoAnn's for a few pieces - the pins, really.  I had all the chains and beads in my own stash.  But I did need the pins with the loops for attachments, so off to the craft store I went.  And of course, being a craft store trip, I found a few other goodies as well.  I was especially excited to find this locket, with a bunny embossed on the front.  It called out to be a pin!

      bunny pin pieces 

      So, using one of the other brooch pins from the package, I draped some silver chain and some linked pearl beads, and there you go:  a simple little shawl pin - with a bunny! 

      bunny pin

      Monday, January 16, 2012

      A pair of quick beading projects

      These are both kinda Pinterest-inspired, but really, I'm just going by a general idea I've seen there.  I like the lariat necklaces - easy to wear and adjust, and easy to fiddle with, as I am known to do with jewelry :)  And, as I've learned, easy to make too!  For both of these, you just need a length of chain, head pins, and accent beads and charms for the chain ends.  The accent charms for this style necklace need to have an opening in them - a ring or knot sort of pattern, that you are passing the other end of the chain through.

      First up, one using black metal chain and charms, with colored beads as accents.  Be sure that the chain loop can pass over your head, as the charms don't fit through one another.  That is, it's an over-the-head sort of necklace, not one that you open and close, so be sure it fits over the head! 

      black lariat  black lariat detail

      The second chain here can be shorter, as the beads can pass through the opening in the silver knot.  I didn't intend for this originally, but Hobby Lobby only had one of the silver knots, so this is what resulted.  Can't complain though - I still really like the finished project!

      silver lariat  silver lariat detail

      Friday, January 13, 2012

      Brace yourselves...

      I'm trying to tackle sewing.

      Not that it will become my go-to craft, but I need to become less scared of it.  I am considering it one of my New Year's resolutions, an extension of my Pinterest resolution.  Several of my pinned projects (heck, a whole Pinterest board of projects) are sewing projects, so I figure I need to conquer this.  And in addition, we need curtains in the bedroom, especially now that we're solidly in winter.  Our bedroom faces east, so we can get sunshine at most inconvenient times of the morning.  Curtains definitely called for!

      The problem lies in how nervous I get about sewing.  I know that you can undo sewing as you can knitting, back it up to take out mistakes, but it's so much easier with knitting.

      So, sewing attempts ahead!  You have been warned...

      Wednesday, January 11, 2012

      Oh, So Pinteresting Wednesday - Painted Doily Tank (& tote)

      Week 2!  So far so good, hanging in there.

      how pinteresting

      This week is a craft project, part of my wardrobe updating efforts.  I have tons of basic polos in almost every color, and plenty of T-shirts, but I'm trying to update things a little.  So, a cute little tank top update is a nice project to tackle.  The inspiration project is here at Maybe Matilda.  She used a basic t-shirt, but I'm using a simple ribbed tank top (available either in your wardrobe already, or $3 at Wal-Mart or similar - doesn't have to be fancy at all)

      What you'll need:
      • a tank or tee
      • a package of paper doilies (you could use single or multiple sizes as you prefer; I used two sizes from a multi-sized pack of doilies)
      • one or more acrylic paints
      • fabric painting medium
      • foam brush or sponge
      • a piece of cardboard (at least as large as your area to be painted - it's to place inside the top to prevent the paint from bleeding through)
      I had never used fabric painted medium before, so had to actually look for it, wasn't something I had in-stash.  I found it at Hobby Lobby in the aisle with puffy paints and acrylic paints and so on.  It's designed to be mixed in with regular acrylic paints so that it becomes a fabric paint that won't wash out once it's set.  Oh, the possibilities!  However, be sure to read all the directions - different brands vary with their directions!!

      And now onto the shirt:

      1.     Put the piece of cardboard underneath the layer of fabric to be painted.  For the tank top (or a shirt, if you want to), that's inside the shirt.

      lace paint tank in progress

      2.     Mix your paint and fabric medium according to the directions (mine says to use a 2 to 1 mix of paint to medium).

      3.     Arrange your doilies however you want on your top.  I liked the look of the inspiration t-shirt, where the lacy paint wrapped around the side of the tee.  I started with the medium-size doily from my multi-pack, placed down near the hem of the shirt.

      4.     Lightly sponge paint over the doily.  You don't need to be too heavy-handed with the paint - the doilies tend to curl if they are over-loaded with paint (wet paper, you know).  Paint as much as you want.  I sponged just a little past the edge of the doily, so that you'd see the edge of the lace, but not much further than that.  Just go as far as you like, whatever you think looks good.

      lace paint tank in progress

      5.     Gently peel up the doily when the area is painted.  I loved how this looked, the painted laciness!

      6.     Proceed to your next doily.  Arrange it as you like, paint as before.  I liked mine slightly overlapped and slightly offset (like bubbles, not like a snowman, if those analogies make sense).  The second two doilies I painted were the smallest size from my multi-pack.  I liked the decreasing look.  But, as this is a DIY project, you can do it however you like!

      lace paint tank in progress

      7.     When it's all painted as you want, set the paint according to the directions on the medium bottle.  Mine instructed you to heat set it (iron from the back of the fabric for at least 20 seconds), then let dry for 7 days, then wash.  Then, it's finally done.  I know, 7 days is an eternity when you want to use something you've just completed!!  I've seen other brands referred to with a 24 hour drying time, but the brand at Hobby Lobby was 7 days, so I went with what I had.

      lace paint tank

      8.     And then the wait is over!  Time to model - Ta-da!

      lace paint tank


      And while I was at it, I painted up another project.  This Monogrammed Tote was another project I'd found via Pinterest, and was actually one of the first projects I pinned.  I just love the look!  I had a plain canvas tote bag that needed some decorating, too, so this was just perfect.  The supplies are the same as the above project - paint, medium, doilies - plus a letter stencil and a tote instead of a tank.

      inital tote supplies

      I used the same technique that I used above.  I painted the doily first, then stenciled in the letter.  It was easier to lay the letter stencil in the open middle of the painted doily, then risk smudging the letter under the paper doily.  I had a stencil for the letter, but you can use a freezer paper stencil (like the inspiration project) if you prefer.

      lacy frame done  initial stencil

      My bag is a little more casual, I guess, compared to the inspiration.  I painted past the edges of the doily, so it does give it a little bit of a different look.  I like mine just as much, but it's something to consider as you're painting your own.

      inital tote  inital tote